Photo Coaster Family History Craft Project
 While writing an article on family history craft projects for Family Tree Magazine, I came across several awesome examples of how to create tile photo coasters to display family photos. After being inspired by The Frugal Girls and Oopsey Daisey blog posts, I decided to create my own set of photo tile coasters—and they turned out great, if I do say so myself.
With my cousin’s wedding coming up, I used old family wedding photos on the coasters to create a unique, personalized wedding gift.
Below is a step-by-step guide to how I created these photo tile coasters, but to get started, here’s a list of the supplies I used:

Project supplies
- photo paper
- a paper cutter
- 4×4 white tiles (obtained from the home improvement store)
- a foam brush
- Mod Podge
- adhesive felt circles
- a skinny felt-tip pen
- a clear, glossy sealer
Step 1. Gather and edit photos. I knew my aunt, who is interested in genealogy, had several old family photos. I asked her for copies, and she scanned them using her Flip-Pal mobile scanner to create digital files. I took the digital files she provided and used Adobe Photoshop to convert them to grayscale (black-and-white) images. I also adjusted the levels and contrast, so the images wouldn’t print too dark.
Step 2. Print and cut the photos. Once I had edited the photos, I used a desktop publishing program (I used Adobe InDesign, but you could also use Microsoft Publisher), to place the pictures in 4×4-inch boxes. I then adjusted the image to center it in the frame.
Next, I printed the images on photo paper using my home printer. Finally, I used my scrapbooking paper cutter to cut out the images.
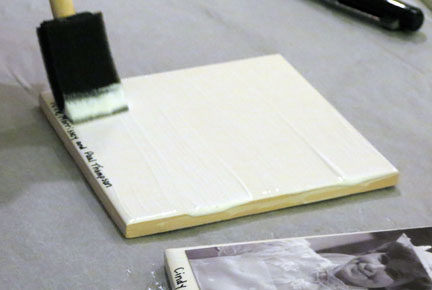
Apply Mod Podge before and after placing the photo on the tile.
Step 3. Apply photo to the tile. Before applying a photo to the tile, I set the photo on the tile to ensure it was the right size and to see how it lined up. If it was a little large, I trimmed the photo with scissors. I then wrote the name of the wedding couple along the bottom of the tile, and allowed the ink to dry.
Next, I used a foam brush to coat the tile with Mod Podge, and then pressed the photo on the tile. After allowing this to dry thoroughly, I put three coats of Mod Podge on the top, allowing each coat to dry thoroughly before applying the next.

Sealer to use on top of the photo
Step 4. Apply sealing coat. To ensure the photo would be sealed and water-resistant when drinks are set on it, I used a water-based sealer I already had on hand from a different project: Minwax’s Polycrylic clear gloss, water-based protective finish.
I applied three layers of this sealer, allowing each layer to dry thoroughly before applying the next. (Note: Other bloggers have used other materials like a clear acrylic spray or resin to seal their photo coaster projects.)
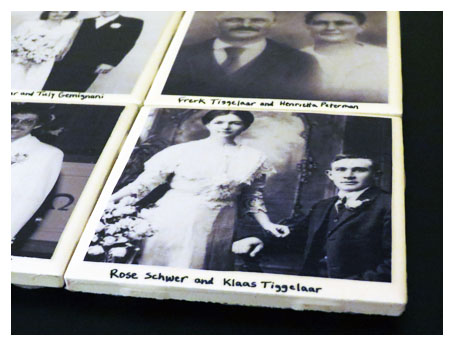
Close-up of final photo coaster project
Step 5: Adhere felt backing. To create a soft surface on the back of the tiles that won’t scratch a coffee table, I adhered four adhesive felt circles to the back of each tile. I placed the felt circles in each corner of the tile.
For more family history craft and holiday gift ideas, check out Family Tree Magazine.
About Dana’s Creative Services
Dana’s Creative Services is a writing and editing services company that helps businesses communicate better with their target audiences. Dana McCullough, owner of Dana’s Creative Services, writes and edits copy for brochures, newsletters, websites, blogs, magazines, and books. Her clients include universities, nonprofit organizations, magazine publishers, and book publishers nationwide. Dana has a bachelor’s degree in journalism and frequently writes and edits copy on higher education, genealogy/family history, health, and business topics.
